BACK TO CEILING BRACKETS MOUNTING PAGE
STEP ONE (B): TO INSTALL ROLLEASY WITH CEILING BRACKETS TO PLASTER LATH CEILING WHERE: CEILING JOISTS RUN PERPENDICULAR TO ROLLERS.
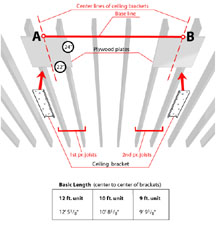
1. Cut two 3/4" plywood plates 24x22 inches.
2. Select two pairs of ceiling joists in the desired installation area so that the distance from the center point of the first pair to center point of second pair most nearly coincides with the basic length* of the model unit being installed.
3. Establish straight line of basic length* centered between outer joists. Use straight edge or chalk line. This is your base line, AB. Brackets must be no closer than 2 1/2" from back wall.
4. Fasten first plywood plate to both members of the first pair of joists, aligning 22" edge of plate flush against line AB and centering plate on joists, as shown. Use 4 packaged 2 1/2" lag screws to affix plate to two points on each joist. For easier installation, pre-drill the four locations with 3/16" drill through plate, plaster and joist.
5. Repeat procedure with second plywood plate on second pair of joists, again making sure that the 22" edge is placed flush against line AB, and plate is centered on joists as shown.
6. Perpendicular to line AB, from point A and point B, must be drawn to cut across the full 24" lengths of respective plates. These perpendicular lines are the center lines of the brackets.
7. Fasten brackets to each plate so that the perpendicular line passes through the centers of each of the 3 slotted holes, and so that slotted hole #2 lies on midpoint of the perpendicular line. Use 1" screws.
Click on the picture to magnify