BACK TO CEILING BRACKETS MOUNTING PAGE
STEP TWO: FINAL INSTALLATION INSTRUCTION FOR CEILING UNITS.
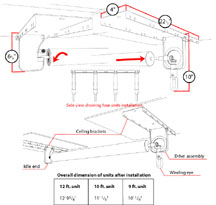
1. The ceiling brackets are designed to hold up to 4 full size backgrounds (these are backgrounds which measure greater than 3 1/2 inches in diameter when rolled onto roller) or 7 compact backgrounds (these are backgrounds which measure less than 3 1/2 inches in diameter when rolled onto roller). See illustration below. To install roller unit, remove all machine screws from top of drive assembly, slide drive assembly inside ceiling bracket, and position so it is aligned with desired set of holes.
2. Place all machine screws through the bracket holes and into the drive assembly housing, tightening each only after all have been inserted.
3. Install idle end into the opposite bracket, and position it against the corresponding set of holes. Insert and tighten all machine screws.
4. Place drive end of roller onto squared shaft of drive assembly.
5. Place male roller end in receiving slot of idle end.
6. When roller is seated, final adjustment should be made by adjusting position of ceiling bracket by use of slotted holes so that roller has 1/8" lateral movement for correct operation. Install 3 or 4 additional screws along the inboard edge of each ceiling bracket where the majority of the weight is supported.
7. When installing multiple roller units, the additional roller assemblies are to be installed in the other open hole sets. (NOTE: For full size backgrounds and for all model MW units, the roller assemblies must be installed in every other hole set. For compact backgrounds, roller assemblies can be installed in consecutive hole sets).
8. To assemble crank, simply affix crank handle to crank rod using screw provided.
9. In actual operation of Rolleasy, the roller will turn only when a slight downward pressure is applied on the crank during cranking, disengaging the locking device of the drive assembly.
Click on the picture to magnify
BACK TO CEILING BRACKETS MOUNTING PAGE