MOUNTING WALL BRACKET UNIT
STEP ONE: TO INSTALL ROLLEASY WITH WALL BRACKETS
1. Cut two 3/4" plywood plates 12 x 20 inches.
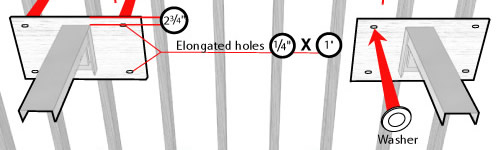
2. Locate two pairs of wall studs in the desired installation area so that the distance from center point of first pair to center point of the second pair coincides with the basic length' of the model unit being installed, Having determined stud locations, drill 4 elongated holes in each plate, size 1'l4," x 1", so that center of hole falls upon center of stud.
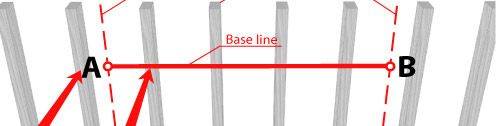
3. Draw a straight line of basic length* centered between outer studs. Use straight edge level or chalk line. This, then, is your base line, AB.
4. Place each plate against its respective pair of studs, accurately aligning 20" edge to base line, and center each plate on its respective pair of studs, While held in this position, drop perpendicular line from points A and B to pass through entire 12" height of the plywood plates.
5. Remove plates and place brackets upon them so that top edge of bracket falls 2 3/4 " from top edge of plate, and outer edge of brackets is aligned against perpendicular line.
6. Mark and drill 1/4" holes through plates to coincide with pre-drilled holes in bracket. Insert bolt from plate side through plate and bracket and secure with nuts.
7. Replace plates with affixed brackets against studs in the exact position in which they were previously held.
8. Drill through center of elongated holes with 3/16" drill to enter wall and center of studs. Fasten with packaged 2 1/2" lag screws and washers.

![]()
|
*Basic Length (outside
edge to outside edge of wall brackets)
|
|
12 ft. unit 12' 9 1/8" |
10 ft. unit 11' 1/8" |
9 ft. unit 10' 11/8" |
STEP TWO: FINAL INSTALLATION INSTRUCTIONS FOR WALL BRACKETS
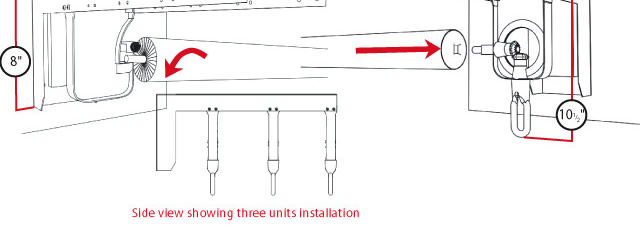
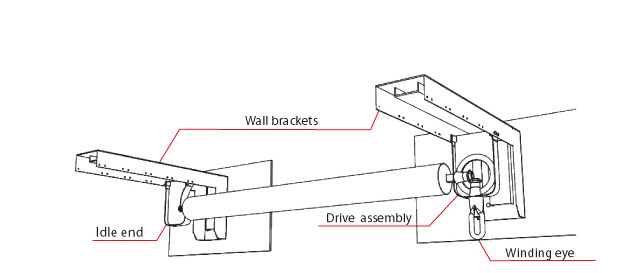
1. The wall brackets are designed to hold up to 3 full size backgrounds (these are backgrounds which measure greater than 3 1/2 inches in diameter when rolled onto roller) or 5 compact backgrounds (these are backgrounds which measure less than 3 1/2" inches in diameter when rolled onto roller). See illustration. To install roller unit, remove all machine screws from top of drive assembly, slide drive assembly inside wall bracket, and position it so it is aligned with desired set of holes.
2. Place four machine screws through the bracket holes and into the drive assembly housing, tightening each only after all are in place.
3. Piece idle end into the opposite bracket, and position it against the set of holes. Place and tighten all machine screws.
4. Place drive end of roller onto squared shaft of drive assembly.
5. Place male roller end in receiving slot of idle end.
6. When roller is seated, final adjustment should be made by adjusting position of plywood plates by use of slotted holes so that roller has 1/8" lateral movement for correct operation.
7. When installing multiple roller units, the additional roller assemblies are to be installed in the other open hole sets. (NOTE: For full sire backgrounds and for all model MW units, the roller assemblies must be installed in every other hole set. For compact backgrounds, roller assemblies can be installed in consecutive hole sets.)
8. To assemble crank, simply affix crank handle to crank rod using screw provided.
9. In actual operation of Rolleasy, the roller will turn only when downward pressure is applied on the crank, during cranking, disengaging the locking device of the drive assembly.

![]() DOWNLOAD
MOUNTING WALL UNIT INSTRUCTIONS (zip 255kb)
DOWNLOAD
MOUNTING WALL UNIT INSTRUCTIONS (zip 255kb)
BACK TO SUPPORT PAGE ------ MOUNTING CEILING BRACKET UNIT--------USE OF CUTTING EDGE-------INSTALLING BACKGROUND PAPER TO ROLLER